About 18 months ago I was at a loose end and in a creative mood so rather than start something quick and easy I went batshit crazy and decided to do as close to a lifesize Claptrap (from 2K games 'Borderlands') as I could. Digging around in my Dads workshop I found some plywood and decided to go for it. Doing it in between work (and not having much of a clue about most of the stuff involved) meant it took about 2 months, and it still isn't totally finished, but I still reckon it was worth it.
The four body panels jigsawed out of plywood with the front and back 'wheel arches' removed.
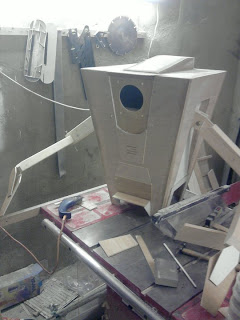
After cutting the side arm and front lens ports the body was taped together to check the pieces lined up and the basic shape was right.
cut and glued angled batons to reinforce the internal corners then nailed several times through each side to hold it firmly together.
another piece of plywood cut into a square for the 'lid' here just checking it fits snugly on top (resting on the batons from before)
Additional rough details added to the lid and grill to the front plate. Once again out of plywood. To remove the joins between the lid and it's additions I mixed fine sawdust (plenty of that around) with pva glue and brushed it round the edges followed by a very thorough (and long) sanding.

Interior and exterior of the arm sockets. I made a rectangle frame sized to fit the arm ports out of leftover batons. After cutting a square of thick board and angling the edges to fit as a base inside I fixed the box to the body then using a backplate as an anchor I curved and fixed down a piece of plywood to match the shape of Claptrap. I then chiselled and fixed the 'shoulders' for attaching the arms.
The wheel started out as a 10" turning blank which was smoothed down on a lathe. I then used filler to create a smooth 'tire' surface and marked out a rough 'hubcap' design.
'Progress so far' shot. Lens port finished on the front along with the front and back wheel arches. The black cylinder at the bottom of the picture is the 'eye' made using the end of an extractor hose with a magnifying glass lens fitted inside (by some miracle the diameter of the hose end was perfect for the lens)
rough arms loosely bolted into position to check the proportions.
First paint coat, I added black 'outlines' to the paint to simulate the cartoon cel-shaded look of the game.
arms, hands, shoulder plates etc, first coat.
Further painting, block painting the larger panels of colour
More painting, chevrons added to the arms as well as copper pipes fitted along the lower arms.
Constructed a block base out of spare wood for it to sit on. Opposite sides of the wheel had been flattened and after many hours of trial and error managed to get the body to balance on the wheel. once the balance point had been found I drilled through the base plate of the body, the wheel and the base and fed a bolt through to hold it all in place. Again, fairly miraculous that he balances in his wheel with no additional supports.
Painted, varnished and (nearly) finished. I didn't have the materials around to do the arms and hands properly (accurate to the source material) so at some point I'm going to find a couple of angle poise lamps and tear them apart for bits.
All together about 2 months work, he stands about 3 1/2 to 4 feet tall, and looks pretty good.


